Hen of the woods is one of the most rewarding mushrooms a home grower can produce. Known scientifically as Grifola frondosa and called maitake in Japanese, this mushroom grows in large, frilly clusters that can weigh anywhere from two to twenty pounds when fully mature. It has a rich, earthy flavour that makes it a favourite in professional kitchens, and it carries a long history of use in traditional medicine across Japan and China.
Growing hen of the woods at home is not a beginner project. If you have never grown mushrooms before, starting with blue oyster mushrooms on straw or sawdust will teach you the basics of humidity, contamination control, and harvest timing. Hen of the woods requires a different setup, a longer growing cycle, and more patience. That said, growers who are ready for the challenge find it deeply satisfying because the yields are impressive and the mushroom itself is genuinely difficult to find in shops.
This guide covers everything from identifying the mushroom correctly, to the two main growing methods, to cleaning, storing, and cooking your harvest. Every step connects back to giving the mushroom what it actually needs rather than what most beginner guides assume it needs.
What Hen of the Woods Looks Like and Why Identification Matters
Before you order spawn or set up a growing space, you need to know exactly what a healthy hen of the woods looks like at different stages. Growers who skip this step sometimes mistake a contaminated grow for a successful one, or harvest too early before the cluster has fully developed.
A mature hen of the woods grows as a large circular cluster of overlapping, fan-shaped caps. The caps are grey to brown on top and pale white or cream underneath. They grow outward from a central base, layering over each other in a pattern that many people compare to the ruffled feathers of a roosting hen. That is where the common name comes from. The clusters grow low, always at or near the base of a tree or a buried root system rather than on the side of a trunk the way oyster mushrooms do.
Young clusters are tight and firm, with darker caps and well-defined edges. As the mushroom matures, the caps lighten slightly, spread outward, and the edges begin to look more ragged. The best time to harvest is when the cluster is still firm and the cap edges are intact. Waiting too long produces a mushroom that is tougher in texture and stronger in taste than most people prefer.
One look-alike worth knowing is Berkeley’s polypore, which also grows at the base of trees in large clusters. Berkeley’s polypore has a yellowish colour and a much firmer, almost woody texture compared to the soft, flexible caps of hen of the woods. If the cluster you are looking at has a bright orange or yellow colouring, it is not hen of the woods.
The Two Main Methods for Growing Hen of the Woods
Most mushrooms can be grown indoors on prepared substrate blocks. Hen of the woods is different. It grows best outdoors, partially buried in the ground, because it needs the natural temperature fluctuations and moisture cycles of an outdoor environment to fruit reliably. There are two methods that work consistently for home growers.
The Oak Log Method
This is the traditional method and the one that produces the most consistent results over multiple years. You inoculate a freshly cut oak log with hen of the woods spawn, allow the mycelium to colonise the wood over several months, then partially bury the log outdoors in a shaded spot. The mycelium continues growing through the buried log and into the surrounding soil, and fruiting happens naturally in autumn when temperatures drop.
Oak is the preferred wood because hen of the woods evolved to grow on oak in its natural habitat. White oak, red oak, and burr oak all work well. The log should be freshly cut within the past four to six weeks and free of visible mould or rot before inoculation. Logs that are too old have already been colonised by competing fungi, which will outcompete your spawn before it can establish.
The log diameter should be eight to twelve inches. Thinner logs dry out too quickly and thicker logs take longer than necessary to colonise fully. Once inoculated with plug spawn or sawdust spawn, seal all cut surfaces and inoculation points with cheese wax to prevent moisture loss and contamination. Keep the log in a cool, shaded location and water it during dry spells to maintain moisture.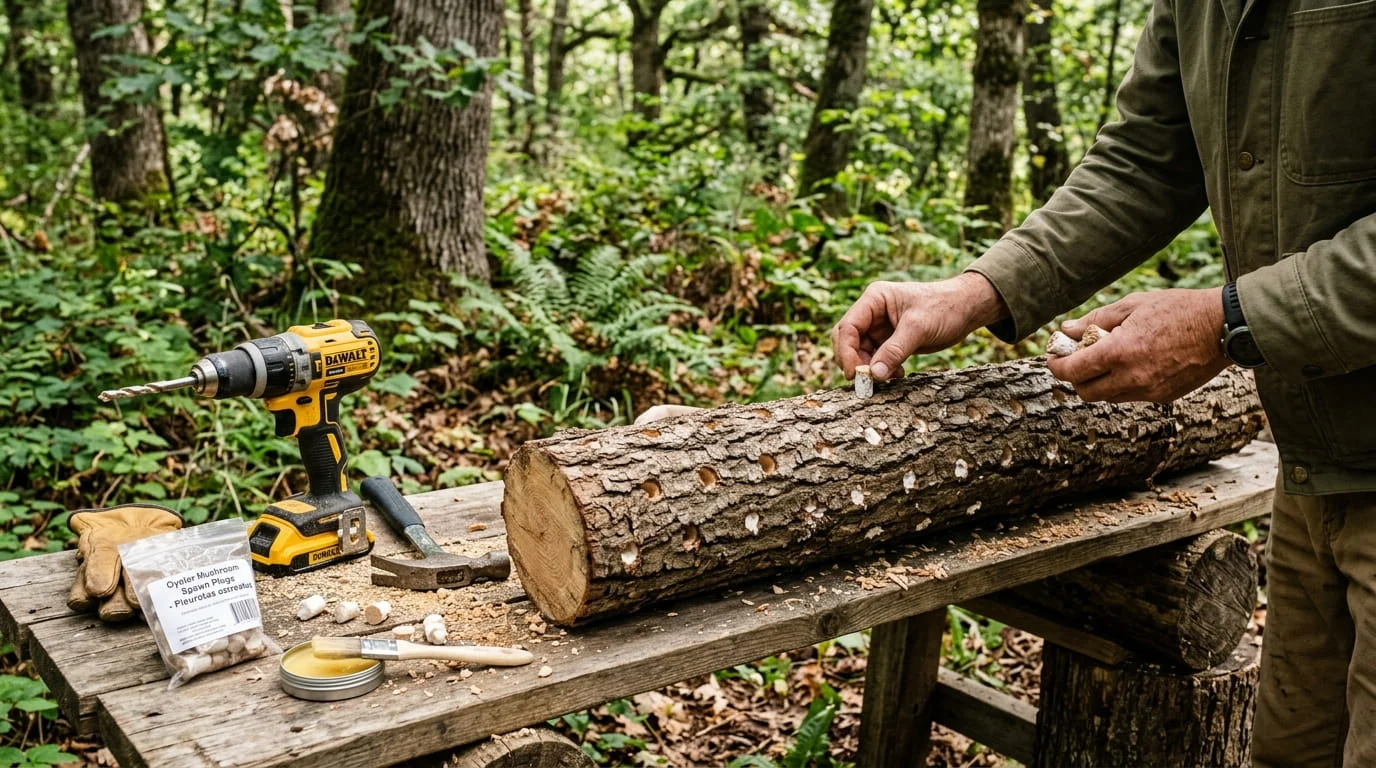
The Outdoor Sawdust Bed Method
This method works well for growers who do not have access to large oak logs or who want a faster setup. You prepare a sterilised hardwood sawdust block, allow it to fully colonise indoors in a sterile environment, then bury the colonised block outdoors in a shaded garden bed in soil that has good drainage. The block acts as the initial food source for the mycelium, which then spreads outward into the surrounding soil.
The key advantage of the sawdust method is speed. Colonisation of a sawdust block takes roughly three to four months, compared to six to twelve months for a log. The trade-off is that sawdust blocks hold less total food than a large oak log, so they typically produce fewer fruiting seasons before the substrate is exhausted. A well-inoculated oak log can fruit reliably for three to five years with minimal maintenance.
Expert Insight Note
Hen of the woods is classified as a weak competitor in mycology terms, which means its mycelium cannot fight off rival fungi the way oyster or shiitake mycelium can. Most failed grows happen not because of poor technique but because the spawn was introduced to wood or sawdust that already carried competing organisms. Sterilising your sawdust substrate at 15 PSI for two and a half hours rather than the minimum 90 minutes makes a significant difference to colonisation success rates. For log inoculation, freshness of the wood is everything. A log cut more than eight weeks before inoculation has almost always begun hosting wild fungi that will outpace your spawn before it establishes. This is the single most common reason experienced growers get no results from an otherwise correct setup.
Setting Up the Right Growing Environment
Hen of the woods does not fruit indoors under standard mushroom growing conditions. It needs cold temperatures to trigger fruiting. The natural fruiting season runs from late August through November in most parts of North America and Europe, and this timing is not accidental. The mushroom responds to the combination of dropping air temperatures, increased rainfall, and the specific soil moisture conditions of early autumn.
For outdoor log or sawdust bed grows, choose a location with dappled shade rather than full sun. Full sun dries out the substrate too quickly and prevents the surface moisture conditions the mycelium needs to form fruiting bodies. The north side of a fence, the shade of a deciduous tree, or a sheltered garden corner all work well.
Soil preparation matters more than most guides acknowledge. According to research published by Penn State Extension on mushroom cultivation, hen of the woods fruiting is strongly linked to soil organic matter content and the presence of decaying hardwood material in the surrounding soil. If your chosen spot has heavy clay soil or very sandy soil with little organic content, mix in hardwood wood chips or leaf compost before burying your log or block. This gives the spreading mycelium a food source to grow into as it expands beyond the initial substrate.
Water the buried log or block during dry periods, particularly in the first summer after inoculation. The goal is to keep the soil around the substrate consistently moist but not waterlogged. A layer of wood chip mulch over the burial site helps retain moisture and moderates soil temperature fluctuations during summer heat.
How Long Hen of the Woods Takes to Fruit
This is where many first-time growers get discouraged and give up too soon. Hen of the woods takes longer to produce its first harvest than almost any other cultivated mushroom species. With the log method, you should expect to wait twelve to eighteen months from inoculation before seeing the first fruiting cluster. With the sawdust bed method, the wait is typically six to ten months.
Nothing visible happens on the surface during most of this time. The mycelium is growing through the wood and expanding into the surrounding soil, building the network it will eventually use to produce a large fruiting cluster. Digging up the log to check progress is one of the most common mistakes growers make. Each time the buried log is disturbed, the mycelium network around it is damaged and the clock on fruiting resets partially.
The signal that fruiting is approaching is a white fuzzy growth appearing at the soil surface around the base of the buried log or block, usually after the first significant autumn rainfall following a period of warm weather. This is surface mycelium pushing up in response to temperature and moisture conditions. A fruiting cluster typically emerges within one to three weeks of this surface mycelium appearing.
Growers managing other long-cycle crops like alfalfa for hay production will recognise this same principle of delayed reward. Establishing the root system properly before expecting yield is what separates a one-time result from a growing system that produces reliably year after year.
What Most Growers Get Wrong About Hen of the Woods
The most common mistake is treating hen of the woods like an indoor mushroom. Many first-time growers buy spawn, inoculate a sawdust block, and set it up indoors next to their oyster mushroom grow. The block colonises, looks healthy, and then produces nothing. Hen of the woods simply does not fruit at indoor room temperatures. It needs the cold trigger of autumn outdoor conditions, and no amount of refrigerating a block indoors accurately replicates what the mushroom is waiting for.
The second mistake is using the wrong wood. Poplar, willow, and fruit woods are excellent for oyster mushrooms but produce very poor results for hen of the woods. This species co-evolved specifically with oaks and a small number of other hardwoods including maple and elm. Using the wrong wood species means the mycelium can colonise but the chemistry of the wood does not support the fruiting trigger the mushroom needs.
A third mistake is harvesting too late. Once the cap edges begin to curl upward and the colour shifts from dark brown to a lighter tan across the whole cluster, the mushroom has passed its peak. Older clusters release spores heavily, which creates a white powder over everything nearby and signals that the eating quality has declined. Harvest when the cluster is firm, the caps are still curved downward at the edges, and the overall colour is still a rich grey-brown.
How to Clean Hen of the Woods After Harvest
Hen of the woods grows close to the ground and its layered cap structure traps soil, leaf litter, insects, and debris between the fronds. Proper cleaning before cooking or storing is not optional. A poorly cleaned cluster will carry grit into whatever dish you make with it, and the texture of the mushroom makes this grit hard to remove once cooking has started.
Start by breaking the cluster into smaller sections at the natural branch points rather than cutting through it. This exposes the inner surfaces where most debris collects. Shake each section gently over a bowl to dislodge loose soil and insects. A soft brush works well for removing dried debris from the cap surfaces without damaging the fronds.
Hen of the woods can handle a brief rinse under cold running water, which separates it from most other mushrooms that should be kept completely dry. Run water through each section and shake firmly to remove hidden debris. Pat dry with a clean cloth and allow to air dry on a rack for twenty minutes before cooking or storing. Do not soak the sections in water as the mushroom absorbs moisture quickly and becomes waterlogged, which ruins both the texture when cooked and the storage life when refrigerated.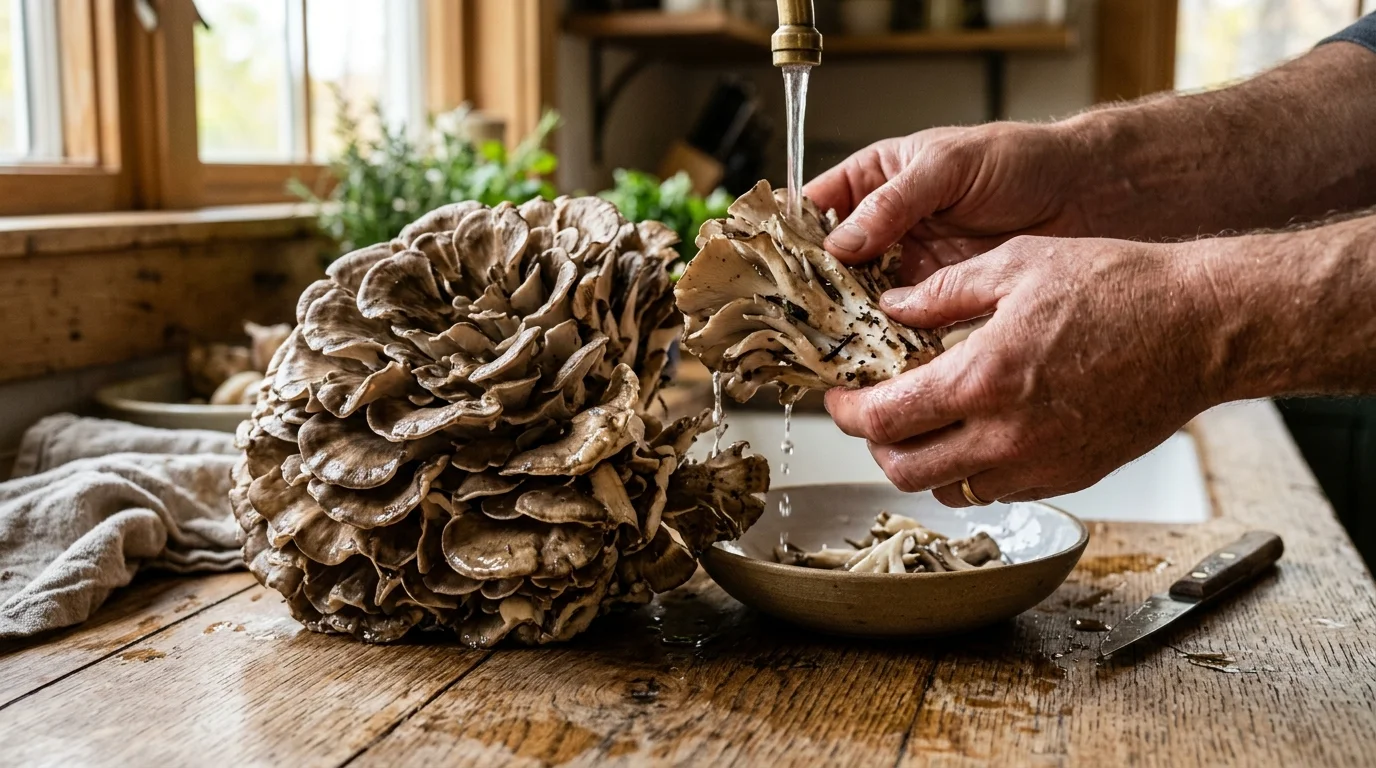
Storing and Preserving Your Harvest
Fresh hen of the woods keeps for five to seven days in the refrigerator when stored correctly. Place cleaned, dry sections in a paper bag rather than a plastic container. Paper allows moisture to escape slowly, which prevents the surface from becoming slimy. A plastic container traps humidity and accelerates decay even in a cold refrigerator.
For longer storage, drying is the most effective preservation method. Slice the cleaned mushroom into pieces roughly half a centimetre thick and arrange them in a single layer on a dehydrator tray. Dry at 40 to 45 degrees Celsius for six to eight hours until the pieces are completely brittle with no soft spots remaining. Properly dried hen of the woods stores in an airtight container for twelve months without significant loss of flavour. Rehydrate by soaking in warm water for twenty minutes before use.
Freezing works but changes the texture. Blanch cleaned sections in boiling water for two minutes, cool in ice water, drain thoroughly, and freeze in portions. Frozen hen of the woods is better suited to soups and sauces where the texture change is less noticeable than in dishes where the mushroom is served as the main ingredient.
Growers interested in preserving other agricultural harvests for extended shelf life will find that the same attention to moisture control applies across many crops. The principles behind storing chia seeds for long-term freshness reflect the same core idea: remove moisture, exclude air, and control temperature.
How to Cook Hen of the Woods
Hen of the woods has a strong, complex flavour that stands up well to high heat. Roasting is the method that brings out the most flavour. Tear the cleaned sections into pieces, toss with a small amount of oil and salt, and roast at 200 degrees Celsius for twenty to twenty-five minutes until the edges are crispy and the fronds have reduced significantly in volume. The result is intensely flavoured with a texture that ranges from crispy at the edges to chewy and tender at the thicker base sections.
Sautéing in a dry pan before adding oil or butter is another approach that works well. The mushroom releases significant moisture when first heated, and cooking off that moisture before adding fat produces better browning and a more concentrated flavour than adding oil immediately. Cook over medium-high heat without stirring for the first three to four minutes, then toss and continue until the pieces are golden.
Hen of the woods pairs naturally with garlic, thyme, soy sauce, and aged cheeses. Its earthy depth makes it a strong addition to grain dishes, pasta, and broths. Growers who also cultivate vegetables will find it works particularly well alongside slow-roasted campari tomatoes, where the acidity of the tomato balances the richness of the mushroom.