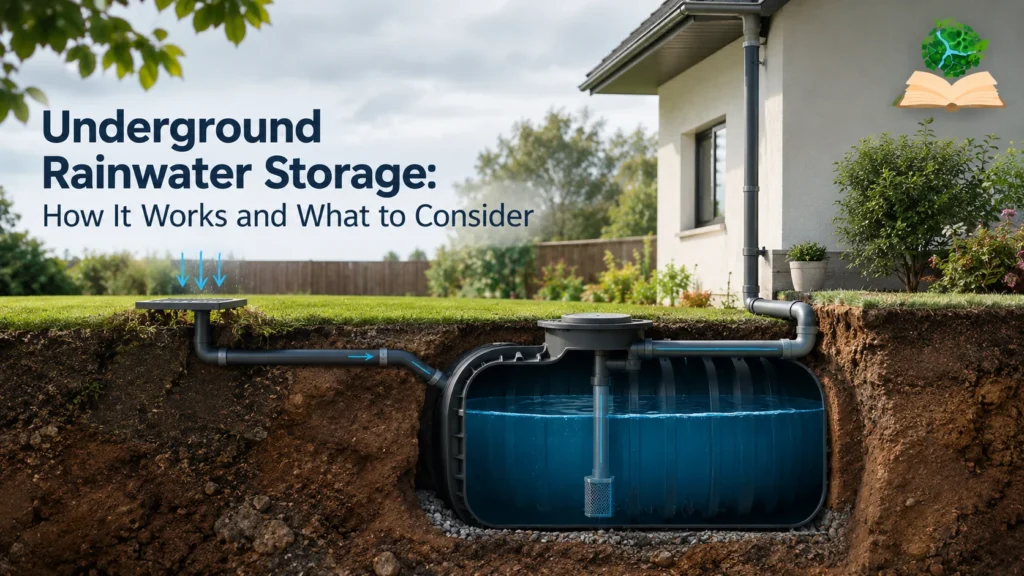

A tank sitting in your yard is easy to picture. A tank sitting under your yard is a different kind of decision, one that trades visible convenience for hidden capacity, and gravity for a pump. Underground rainwater storage has quietly become one of the most requested upgrades in residential water systems, largely because it solves the two biggest objections to harvesting rain in the first place: it takes up no usable space, and it keeps water cool, dark, and stable through every season. But burying a cistern isn’t just above-ground storage moved a few feet down, it’s a different engineering problem, with its own materials, its own installation rules, and its own failure modes.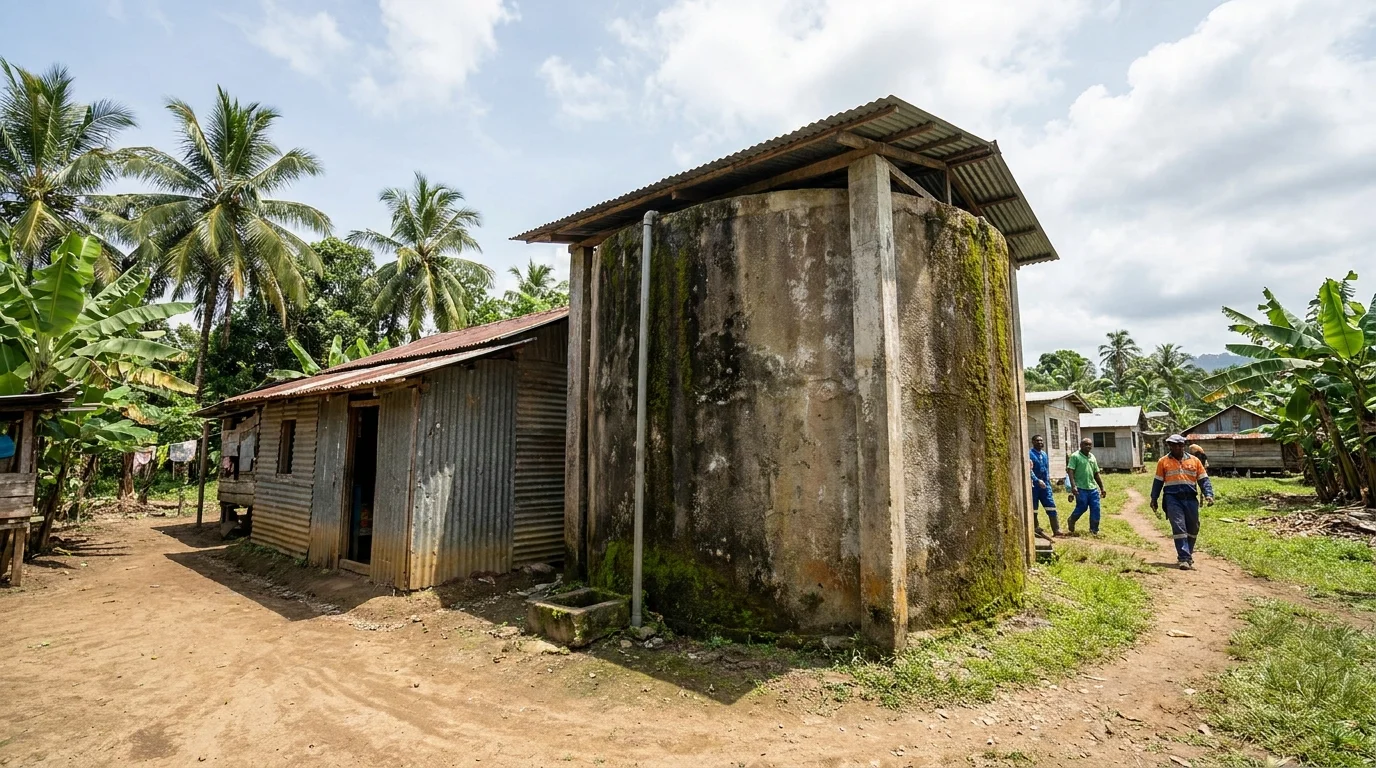
This guide walks through how underground rainwater storage actually works, how it compares to above-ground tanks, what the different tank materials mean for your soil and your budget, and what installation, sizing, and maintenance look like once the truck leaves and the yard is filled back in. For the treatment side of the equation, turning that stored water into something safe to drink, our companion guide on how to filter and purify rainwater covers it in full; this article stays focused on storage.
Why Go Underground
The appeal of burying a cistern comes down to three things most homeowners discover the hard way with above-ground tanks: space, temperature, and light. A buried tank disappears under a lawn, driveway, or garden bed, freeing up yard space that a 1,500-gallon poly drum would otherwise dominate. Below the frost line, water stays insulated from both summer heat and winter freeze, which matters more than it sounds: a tank exposed to direct sun cycles through wide temperature swings that encourage algae growth, while a tank left above ground in a cold climate risks cracking when its contents freeze solid. Soil does both jobs at once, moderating temperature and blocking light, which is why underground storage is the default choice in colder regions and increasingly common wherever full-time, year-round harvesting, not just seasonal garden watering, is the goal.
None of that comes free. Underground systems cost more to install, require a pump in almost every case, and are harder to inspect or modify once backfilled. The rest of this guide is really about weighing that trade honestly.
How an Underground Rainwater Storage System Works
The water’s path looks the same at the start as it does for any rainwater harvesting setup: roof → gutters → downspouts → pre-filtration → storage. What changes underground is everything after the tank.
Rain leaves the roof, passes through gutter screens and a first-flush diverter, and then typically runs through a fine pre-filter (a vortex-style unit is common) before entering the buried cistern. Inside the tank, a calming inlet releases incoming water gently at the base so it doesn’t stir up settled sediment, while a floating filter draws from just below the surface, where the water is cleanest. An overflow outlet sheds excess water once the tank is full, and depending on the site, that overflow can be directed to a rain garden, a drainage swale, or simply allowed to soak back into the ground and recharge the local water table.
Because the cistern sits below the level of the fixtures it’s meant to serve, water can’t flow out by gravity the way it can from an elevated above-ground tank. A submersible or externally mounted booster pump is doing the work in almost every underground installation. This isn’t an optional upgrade, it’s a structural fact of the design. A vent pipe equalizes air pressure as the water level rises and falls, and a manhole riser extends the access opening up to grade so the tank can be inspected or serviced without re-excavating the yard.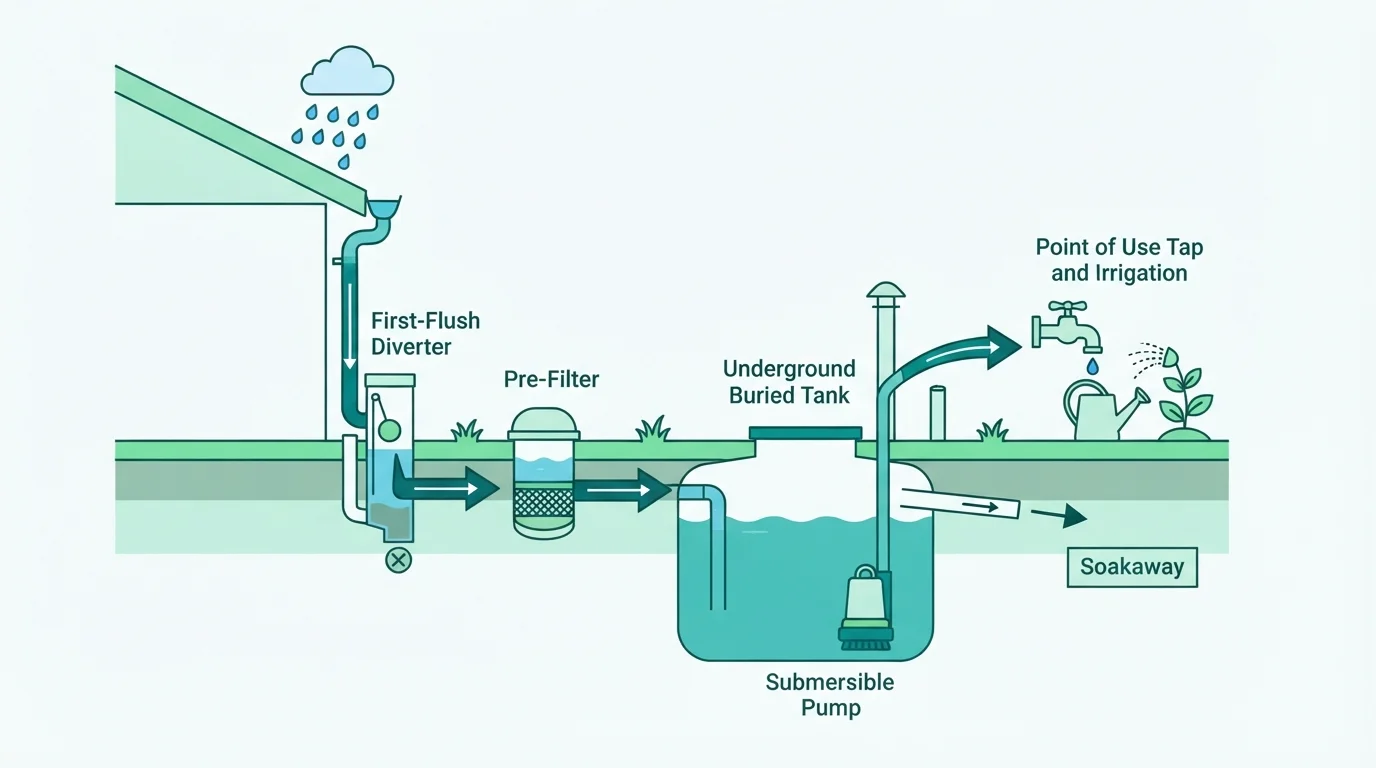
Expert Insight
Underground storage buys you thermal stability and hidden space, but it also removes the option of gravity feed. Every underground system needs to be designed around a pump from day one; retrofitting one later, or relocating fittings that were set wrong at install, generally means digging the tank back up.
Underground vs. Above-Ground: Making the Call
Underground tends to make sense when:
- Yard space is limited, or you’d rather not look at a tank
- Your climate sees hard freezes, and below-frost-line burial is the only way to keep water usable year-round
- You want the stable, cool, dark conditions that naturally suppress algae
- You’re planning for full-time, year-round supply rather than seasonal garden use, and expect to stay in the home long enough to justify the higher upfront cost
Above-ground tends to make sense when:
- Budget is the primary constraint
- The climate is mild enough that freezing isn’t a concern
- The system is mainly for seasonal irrigation or backup use
- Gravity feed is possible and you want to avoid depending on a pump
- Easy visual inspection and simple maintenance access matter more than aesthetics
One rule cuts across all of this: above-ground tanks cannot simply be buried. They aren’t engineered to bear soil load, and manufacturers generally void the warranty if they’re installed below grade. Going underground means buying a tank, poly, fiberglass, concrete, or steel, that was actually designed for it, not repurposing a surface tank to save money.
The underground trade-offs worth sitting with before committing: excavation adds real cost, a pump becomes mandatory, fittings and access points have to be right the first time because changes later mean digging back in, tanks can float out of the ground if the water table rises while they’re empty, and any tank placed under a driveway or parking area needs to be rated for vehicle traffic load. A standard buried poly tank is built for pedestrian and garden loads only, not for a car parked overhead.
Tank Materials Compared
Not all buried tanks are built the same way, and the material you choose affects cost, lifespan, and how well the tank handles soil pressure and groundwater.
| Material | Installed cost (per gallon)* | Typical lifespan | What to know underground |
|---|---|---|---|
| Reinforced polyethylene | ~$1.50–$3.50 | 30–50 years | The most affordable buried option. Lightweight, corrosion-proof, and ribbed to resist soil pressure, but light enough to float when empty if backfill and anchoring aren’t done correctly. |
| Fiberglass | ~$2.00–$5.00 | 40–60 years | Corrosion-resistant and easier to maneuver into place than concrete. The seams, typically hand-laid, are the point most likely to fail over time. |
| Concrete (precast or poured) | ~$2.50–$6.00 | 50–80+ years | The long-term standard for full-time residential underground use. Heavy enough to resist flotation on its own, and its natural alkalinity helps offset the mild acidity of rainwater. A precast 5,500-gallon cistern, fully installed, typically runs $17,000–$21,000. |
| Corrugated / bolted steel | ~$1.00–$3.00 (shell only) | Shell: 30–50 yrs; liner: 10–15 yrs | Cost-effective at large capacities, but the interior liner that actually holds the water needs periodic replacement. |
| Stainless steel | Premium | Long | Corrosion-resistant and liner-free, but cost tends to push it toward above-ground use rather than burial. |
*Installed cost estimates vary significantly by region, tank size, and site conditions. Treat these as planning ranges, not quotes.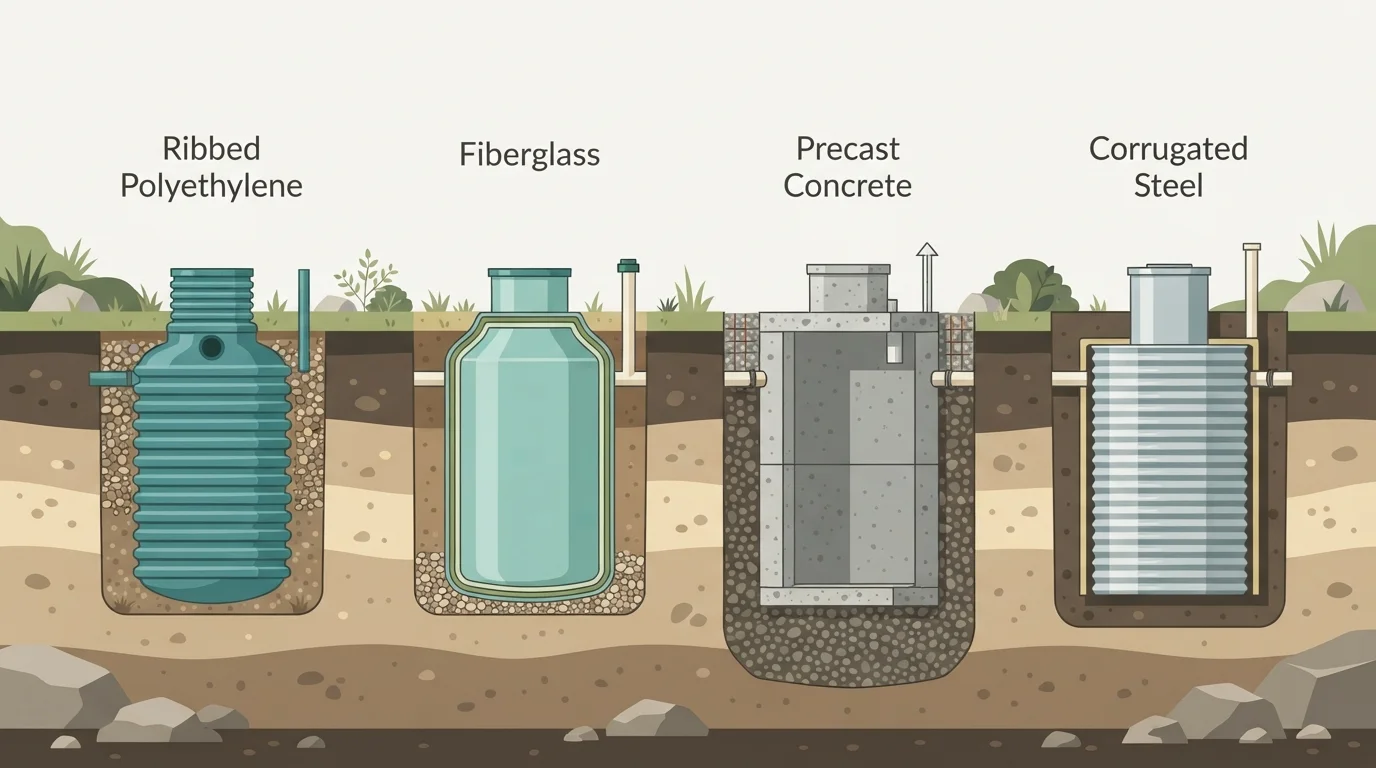
A detail most buying guides skip entirely: rainwater is naturally a little acidic, and in a plastic or fiberglass tank connected to copper household plumbing, that acidity can slowly leach trace copper into the water. Concrete’s alkalinity buffers this effect, which is one reason it remains the material of choice for cisterns feeding indoor plumbing. Whether that stored water needs to meet potable or non-potable standards depends entirely on end use; irrigation and toilet flushing have very different requirements than a kitchen tap.
Installation & Site Considerations
Underground installation is not a weekend DIY project in most cases. The combination of soil engineering, load ratings, and plumbing typically calls for a licensed installer. Still, understanding the process helps you evaluate a quote and ask the right questions.
- Call 811 before any digging to have utility lines marked.
- Excavate roughly 12 inches wider and deeper than the tank on every side, to leave room for a proper bedding layer and even backfill.
- Bed the tank on about 6 inches of compacted sand in ordinary soil, or up to 12 inches in rocky ground, with a slight slope built in for concrete installations to aid drainage and future cleaning.
- Backfill in shallow lifts of about 6 inches at a time, compacting as you go, using clean sand or small pea gravel. Clay, silt, wood debris, and masonry rubble should never go in the backfill; they settle unevenly and can crack the tank.
- Set the inlet below the local frost line so incoming water never freezes in the pipe.
- Fill the tank with water as you backfill, not after. An empty tank in loose, saturated backfill is exactly when flotation happens.
- In high water table or flood-prone areas, plan to anchor the tank. Concrete deadman anchors or a reinforced hold-down pad extending past the tank’s footprint are common solutions. A widely used rule of thumb, borrowed from underground fuel-tank engineering but applied broadly to buried cisterns, holds that if roughly 70% or more of a tank’s volume sits below the expected flood or water-table level, it needs to be anchored against buoyant uplift.
What it costs. Per HomeGuide, installed underground rainwater systems commonly run $6,500–$24,000, against roughly $2,000–$12,000 for a comparable above-ground setup, with excavation alone typically adding $1,000–$5,000 depending on soil and access. Per Angi, in-ground cisterns that include full excavation, regrading, piping, and labor often land in the $12,000–$21,000 range, against $1,500–$4,500 above ground. Ongoing upkeep (filters, pump servicing, water testing) typically adds $740–$1,000 a year. All of these figures vary by region, soil type, and tank size, so treat them as planning benchmarks rather than fixed quotes.
Sizing Your Cistern
Sizing starts with a simple, widely used formula:
Harvestable gallons = Roof catchment area (sq ft) × Rainfall (inches) × 0.623 × runoff coefficient (≈0.80)
The 0.623 figure isn’t a rounded estimate. It’s the exact conversion of gallons per square foot per inch of rainfall (7.48 gallons per cubic foot, divided by 12 inches per foot). Water utilities that publish rainwater-harvesting guidance generally simplify this to roughly 0.6 gallons per square foot of roof per inch of rain, which is why a modest 1,000-square-foot roof can generate around 600 gallons from a single inch of rainfall, a number that surprises most homeowners the first time they see it.
Use the roof’s footprint area, not the floor area of the house, and build in a runoff coefficient below 1.0 to account for splash-out, evaporation, and first-flush losses. For a system meant to supply the household continuously rather than just top off during storms, size the cistern for roughly a 30–60 day reserve based on expected demand.
Local codes sometimes set a hard floor under this math. Per the Ohio Administrative Code, no new cistern smaller than 2,500 gallons per dwelling unit may be installed, a reminder to check minimum capacity rules in your area before finalizing a tank size.
Maintenance: What Buried Tanks Actually Need
Out of sight shouldn’t mean out of mind. Underground tanks need less frequent attention than above-ground ones in some respects (no UV exposure to manage, no risk of freeze-cracking if buried correctly), but the maintenance that is required matters more precisely because the tank is harder to see into.
- Routine, several-times-a-year checks: clear gutters and inlet screens, service the first-flush diverter, check the pump strainer, and confirm the overflow is clear.
- Sediment inspection every 2–3 years. Solids settle over time regardless of how well the system is filtered, and cleaning is generally recommended once sediment visibly covers the tank floor, a standard echoed in Australian rainwater-tank guidance from that country’s national health authority.
- Full washout roughly every three years is the general benchmark from the American Water Works Association’s manual on potable water storage, with annual washouts recommended where sediment tends to build up faster.
- Because you can’t just look inside a buried tank, contamination or sediment buildup can go unnoticed longer than in an above-ground system. Robotic or remote-camera inspection tools now make it possible to check a cistern’s interior without draining it or sending anyone inside.
- Never enter a cistern casually. A below-grade tank is a confined space by definition, and US workplace safety regulations (29 CFR 1910.146) govern confined-space entry for good reason: atmospheres inside a sealed underground tank can be oxygen-poor. Manhole design on rainwater cisterns is generally expected to account for this.
Codes, Standards & Permits
Underground cisterns sit at the intersection of plumbing code, building code, and local water regulation, and the rules genuinely vary by jurisdiction, though a handful of national reference points shape most of them.
The ARCSA/ASPE/ANSI 63 standard for Rainwater Catchment Systems, developed jointly by the American Rainwater Catchment Systems Association and the American Society of Plumbing Engineers, is the closest thing the US has to a unified design and installation reference. It allows cisterns to be installed either above or below grade, but requires below-grade designs to comply with the local authority having jurisdiction and, where appropriate, be certified by a structural engineer. It also calls for manhole risers on outdoor below-grade cisterns to extend a minimum of about 4 inches above surrounding grade, sets manhole design requirements around confined-space safety regulations, and lays out testing intervals: non-potable systems are generally expected to be tested annually, potable systems roughly every three months.
Beyond that standard, the 2015 edition of the Uniform Plumbing Code introduced formal rainwater-harvesting provisions, and individual states layer their own requirements on top; California’s plumbing code, for instance, addresses rainwater systems directly in its own chapter. In 2024, the US General Services Administration began requiring compliance with ARCSA/ASPE/ANSI 63 for large federal rooftop-catchment projects, a sign of how far the standard has moved from niche guidance toward mainstream code reference.
None of this substitutes for a call to your local building department. Permitting requirements for excavation, structural design, and plumbing connections are set locally, and confirming them before digging is the single most reliable way to avoid a costly redo.
Environmental Benefits and Rebates
Underground storage isn’t only a convenience decision. It’s a small piece of stormwater infrastructure sitting in a residential yard. The US Environmental Protection Agency classifies rainwater harvesting systems, cisterns included, as a form of green infrastructure: capturing rain for irrigation or non-potable indoor use reduces demand on treated municipal water while keeping that same water out of storm drains, where it would otherwise pick up pollutants on its way to local waterways. Storm runoff remains one of the leading contributors to water pollution in the US, and every gallon captured on-site is a gallon that isn’t carrying that pollution downstream. Overflow from a properly designed underground system can also be routed to infiltrate back into the soil, contributing to local groundwater recharge rather than adding to peak stormwater flow.
The scale adds up faster than it seems. A single square foot of roof can generate somewhere in the neighborhood of 20–25 gallons of harvestable runoff over the course of a year, according to state environmental agency estimates, which means even a modest suburban roof represents a meaningful volume of water that either gets captured or gets lost to runoff.
A growing number of water utilities now put money behind that logic. Per the San Antonio Water System, rebates are available for customers who install at least 500 gallons of storage, at roughly a dollar per gallon up to $2,000. Several California water districts offer similar per-gallon rebates, and Texas exempts rainwater-harvesting equipment from state sales tax entirely. Programs like these change often and are hyper-local, so the right move is always to check directly with your own water utility before budgeting a project around an assumed rebate.